


SeedGenes Tutorial
Welcome to the tutorial section of the SeedGenes database. We describe here methods used in our laboratory to characterize recessive embryo-defective (emb) mutants of Arabidopsis. This information may be of interest if you: (1) want to learn more about seed development in Arabidopsis; (2) have found a knockout in your gene of interest through reverse genetics but suspect it may be lethal because you have not identified a homozygote; (3) want to characterize in more detail an existing embryo-defective mutant being studied in your laboratory; or (4) want to adopt the protocols we use to generate information presented in the SeedGenes database. Links provided in the outline below direct you to appropriate sections of the tutorial. Additional details can be obtained in recent publications related to the SeedGenes Project. Portions of the tutorial have been adapted from: Meinke DW (1994) Seed Development in Arabidopsis thaliana. In: Meyerowitz EM, Somerville CR (eds), Arabidopsis. Cold Spring Harbor Laboratory Press, pp. 253-295.Outline of Tutorial
- General Features of Siliques
- Features of Seed Development
- Maintenance of Embryo-Defective Mutants
- Examining Mutant Seeds with a Dissecting Microscope
- Examining Cleared Seeds with Nomarski Optics
- Completing a Comprehensive SeedGenes Analysis
General Features of Siliques
The seeds of Arabidopsis are produced in fruits known as siliques. Before fertilization, the silique is called the ovary and the seeds are called ovules. Each silique contains two carpels, a central replum, and two long rows of seeds that are attached to the replum through a funiculus. The funiculus guides the pollen tube during fertilization and provides a pipeline for nutrients from the maternal plant. A typical silique produced under optimal conditions contains 40-60 seeds. Click here for a simplified drawing of an immature silique. The number of viable seeds at maturity is determined by the number of ovules produced, the percentage of ovules fertilized, and the frequency of seed abortion. Vigorous plants often produce flowers with about 60 ovules. Most siliques contain at least a few unfertilized ovules resulting primarily from incomplete transfer of pollen to the stigma surface. The frequency of spontaneous seed abortion is influenced by growth conditions but is often less than 1% of fertilized ovules. Distinguishing between unfertilized ovules, mutant seeds, and spontaneously aborted seeds is an important feature of working with embryo-defective mutants.
)
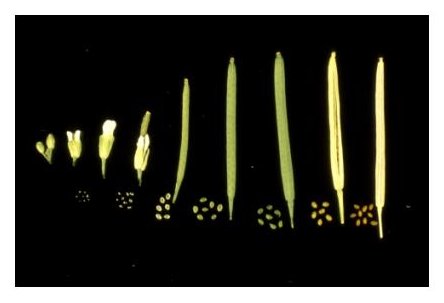
Silique Development: Reproductive development from fertilization to seed desiccation is completed in 2 weeks under standard growth conditions. The developmental stage of an immature silique can be estimated by noting its position along the length of the stem. Young siliques are found at the tip of each stem and older siliques at the base. This allows one to construct a complete developmental progression of seed formation using siliques from a single stem. The exact position of a silique at a desired stage of development is determined by the number of flowers produced per inflorescence per day, which in our lab is often two or three.
Silique Length: The length of individual siliques varies with both developmental age and number of seeds. Siliques begin to elongate from the center of a flower within 24 hours after fertilization and reach a mature length 3-4 days later, at the globular to heart stages of embryo development. Floral organs (petals, sepals, stamens) usually become detached during this period. A developmental progression of siliques at different stages of seed development is displayed below. Siliques with only unfertilized ovules remain attached to the stem but fail to extend beyond 3.5 mm in length. Siliques with 60 seeds reach a maximal length of about 15 mm. Siliques with fewer seeds are considerably shorter. Unusually short siliques are therefore an indication of poor seed set. Siliques remain green until late in development, when they turn yellow and then brown. Mature siliques can be removed from a plant without seed loss. Physical removal of dried valves from a mature silique often results in seed dispersal.
Features of Seed Development
Seed Size: The most striking feature of Arabidopsis seeds is their small size. Wild-type seeds are 0.5 mm long at maturity and weight about 20-30 μg when dried. Although seed size can vary slightly with plant growth conditions and genetic backgrounds, seeds within a single silique are usually the same size. Seed expansion occurs during the first several days after pollination. Seeds at the heart stage of embryo development are therefore about the same size as mature seeds prior to desiccation.
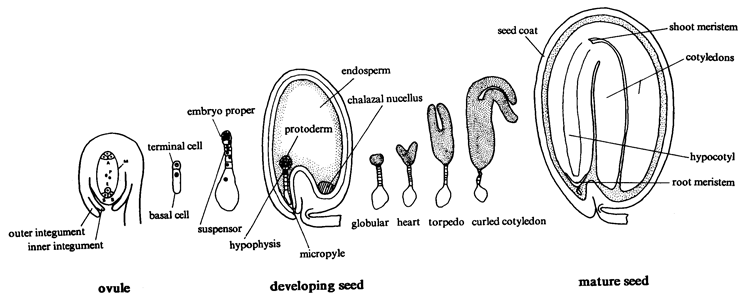
Seed Development: An overview of seed development in Arabidopsis is presented in the drawing below. Nomarski images of cleared seeds are presented in this SeedGenes page. Methods used to generate images of cleared seeds are described elsewhere in the tutorial. Ovules at the time of fertilization are white, nearly transparent, and difficult to manipulate because of their small size. Seeds enlarge during early stages of development but remain white until the late globular stage, when both the seed coat and the embryo begin to turn pale green. Embryos beyond a torpedo stage of development are completely green. Seeds at these later stages appear green because the embryo is visible through the translucent seed coat. The developmental age of immature seeds prior to the globular stage can be judged by seed size, silique length, and silique location relative to the inflorescence. The age of seeds between the globular and cotyledon stages can be determined more readily by seed color and embryo dissection. Development of seeds within a given silique is generally synchronous, although minor differences can be observed at stages of development when rapid changes occur in embryo size and morphology
Maintenance of Embryo-Defective Mutants
)
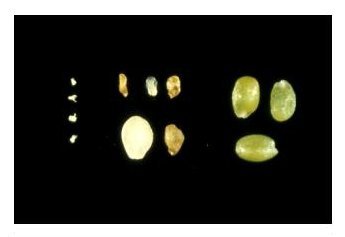
Unfertilized ovules on left, mutant seeds in center, wild-type seeds on right.
Gametophytic Lethals: Another possible explanation for the failure to recover homozygotes through reverse genetics is that the mutation interferes with gametogenesis and no homozygous mutant embryos are even produced. Mutations that are never passed through either male or female gametes will not be maintained and therefore cannot be studied. Some mutations disrupt female gametophyte (megagametophyte) development but not pollen development, germination, or tube growth. These mutations result in heterozygotes with 50% defective or unfertilized ovules that can be distinguished from aborted seeds by their size and color. The same phenotype is observed when heterozygotes are crossed with wild-type pollen. Other mutations interfere with male transmission but not with female transmission. These can be identified either by examining the pollen under a microscope or demonstrating through crosses to wild-type plants that the mutant allele is not transmitted at the expected frequency. Some gene knockouts reduce but do not eliminate transmission through both the male and female gametes. Rare homozygotes that form typically fail to complete embryo development. Plants heterozygous for these mutations often produce siliques with a low percentage of defective seeds. The frequency of aborted seeds is particularly low at the base of the silique.
Growth Conditions: There are many different methods available for growing Arabidopsis. We have long used a method that requires daily oversight and watering but results in vigorous plants with excellent seed production and a low frequency of spontaneous seed abortion. Plants are grown in 3 inch round plastic pots placed in the type of rectangular plastic tubs (12x14 inches) used in many homes and laboratories for washing dishes. A plastic grate (often used as a diffuser for fluorescent light fixtures) is placed in the bottom of the tub to facilitate drainage. The soil contains a mixture of vermiculite (Strong-Lite coarse for plants grown from seeds; medium for transplants; Sun-Gro Horticulture, Pine Bluff, AR), potting soil (Scotts Redi-Earth, Plug and Seedling Mix, Scotts-Sierra Horticultural Products, Marysville, OH), and sterilized sand (12:3:1 v/v/v). Plants are grown in a large room maintained at 24 ± 2°C with circulated building air and placed under banks of 4-foot fluorescent lights kept on 16-h-light / 8-h-dark cycles. Tubs are watered daily from below with a nutrient solution (0.35 g/liter) containing Excel 15-5-15 fertilizer (Scotts Miracle-Gro, Port Washington, NY). This solution is stored in large plastic tubs (kitchen size trash cans), delivered to each tub through a rubber hose by plugging in a submersible pump stored in the nutrient container, and drained by siphoning after the electrical plug has been removed. Pots are submerged in 0.5 to 1 inch of nutrient solution and soaked for several minutes before draining. Watering 4 to 5 tubs in succession is most efficient. We use growth chambers only for plants that have been chosen for crosses. Plants started in a standard growth room are placed in a growth chamber after crosses have been performed and then watered as described above. We find that this protocol increases the frequency of successful crosses.

Planting: Seeds used for planting are placed on a moist piece of filter paper and transferred to the soil surface with closed forceps. We typically plant seeds at specific locations (5 or 9 per pot) to facilitate subsequent tracking. Tubs are covered with clear plastic wrap for the first 48 hours after planting, misted with water to maintain soil humidity, and not placed under lights for two days to avoid overheating. The plastic is then gradually removed and plants are watered from below, first with RO water to minimize subsequent fungal and algal contamination, then with a 50% strength nutrient solution, and finally with 100% nutrient solution.

Watering Details: The procedure followed in our laboratory is presented here.
Nutrient Solution:| Full-strength | 0.50 teaspoon EXCEL per 2 gallons RO water |
| Half-strength | 0.25 teaspoon EXCEL per 2 gallons RO water |
| RO water | Reverse Osmosis (purified) water |
Growth Schedule for Plants Germinated in Soil:
| Day 1 | Plant seeds, mist with RO water, cover with clear plastic wrap |
| Day 2 | Mist underside of plastic |
| Day 3 | Mist underside of plastic; Move tubs under growth lights |
| Day 4 | Mist underside of plastic |
| Day 5 | Open plastic somewhat; water with RO water |
| Day 6 | Remove plastic if germination complete, water with RO water |
| Day 7 | Water with half-strength nutrient solution |
| Day 14 | Water with full-strength nutrient solution |
Growth Schedule for Transplants from Agar Plates:
| Day 1 | Transplant, mist, cover with plastic, place under lights, half-strength solution |
| Day 2 | Mist underside of plastic, water with half-strength solution |
| Day 3 | Open plastic half way, water with half-strength solution |
| Day 4 | Remove plastic, water with full-strength solution |
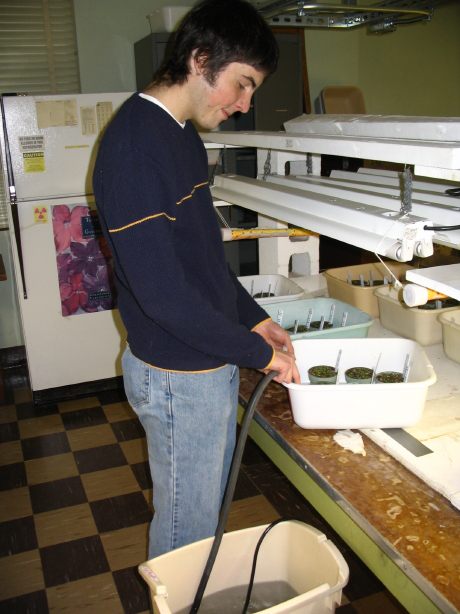
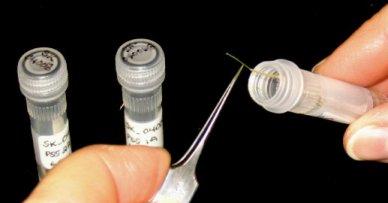
Maintaining Seed Stocks: All seed stocks derived from the SeedGenes Project are available through the Arabidopsis Biological Resource Center (ABRC) at Ohio State University. Stocks can be accessed through TAIR at www.arabidopsis.org. Each vial sent to the stock center is labeled with the line number, allele symbol, seed source, and date collected. Seeds are bulk harvested from self-pollinated heterozygous plants with siliques containing about 25% defective seeds.
Harvesting from Single Plants: We often harvest individual siliques from specific plants in order to minimize seed contamination. When this approach is used, mature siliques are removed by grasping the pedicel with fine forceps and severing the connection with the stem by sliding a second pair of forceps below the first. Care must be taken to avoid shattering dry siliques and losing seeds. Siliques chosen for dry harvest should be brown or yellow, not green. Harvested siliques are placed in small plastic vials with screw tops. We prefer 2 ml Sarstedt vials (Model 72.694) with about 25 siliques per vial. Lids are kept loose for 1 week to complete the drying process. Vials with lids secured are then placed in a refrigerator for long-term storage. Seeds are ready for planting or plating after 1 week of cold treatment.
Harvesting from Multiple Plants: When detailed analysis has been completed for a mutant line and there are no conflicting data or atypical plants, a bulk harvest method of collecting seeds is often utilized. All wild-type plants are removed from pots when screening is completed and remaining plants are allowed to mature. Seeds are then collected from all confirmed heterozygotes by gently compressing plants between fingers and thumb over a clean sheet of white paper. Silique debris is removed and seeds are transferred to a labeled vial.
Examining Mutant Seeds with a Dissecting Microscope
Preparing Siliques for Observation:
Picking Siliques at the Optimal Stage: Siliques chosen for screening must be sufficiently mature to allow normal and aborted seeds to be distinguished based on general morphology. This is because all mutant seeds initially resemble normal seeds before development becomes abnormal. The minimal age for screening will depend on the mutant involved. Mutant seeds arrested early in development can be distinguished from normal seeds in younger siliques than mutant seeds arrested late in development. The best approach is often to screen siliques in which the normal seeds are green and have reached an advanced cotyledon stage of development. Mutant seeds in these siliques can then be distinguished either by their altered size and color or by the abnormal morphology of embryos removed for observation. Siliques at more advanced stages are difficult to split without losing seeds. Mutant seeds in these mature siliques are also more likely to be deflated and difficult to dissect. Optimal Nomarski images of cleared seeds are obtained from siliques before mutant seeds have started to deflate and turn brown. When searching for a silique at the optimum age for observation, we often start with green siliques near the base of the stem and work upwards toward the inflorescence.
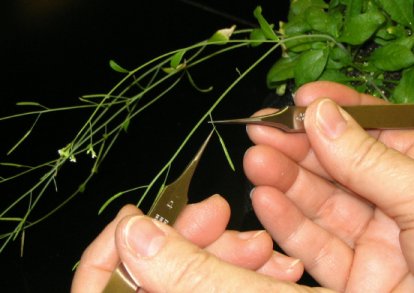
Opening a Silique: Splitting of siliques is most readily performed under a dissecting microscope at intermediate magnification (20X). Most of the silique should be in view at once. We use incidental light rather than transmitted light and place siliques on a glass microscope slide to facilitate manipulation and protect the base plate of the microscope. Most lab members prefer the black side of a reversible plate. When microscopes have been adjusted to be parfocal, siliques viewed at different magnifications remain in focus. To make this adjustment, focus first at high magnification using the focus knob on the microscope and then focus again at low magnification using each eyepiece ring. Siliques with a small amount of pedicel attached are most easily manipulated. If you are right handed, grasp the pedicel with fine forceps in your left hand and use either another pair of closed fine forceps or a syringe in your right hand to split the silique longitudinally along lines of natural dehiscence. Quality forceps (e.g. Dumont-Inox #4 or #5) are required. Start at the base of the silique (near the pedicel) and move towards the tip (stigma surface). Some lab members prefer to keep their left hand still and gradually move their right hand to complete the split. Others prefer to keep their right hand still and move the silique with forceps in their left hand. Siliques at cotyledon stages of seed development are more readily split than siliques at a preglobular stage because the lines of natural dehiscence are more clearly defined. Another option for dealing with the youngest siliques is to grasp the pedicel and one carpel with two pairs of forceps and peel back the carpel, moving from the base of the silique to the tip. This approach is often used when young seeds need to be removed from siliques without damage. Once the two valves have been separated, use your forceps and/or syringe to push the valves further apart, revealing two long rows of seeds. With practice this can be done without losing or destroying any of the seeds.
Characterizing Mutant Seeds: Mutant seeds at the time of analysis can differ in size, color, viability, extent of desiccation, embryo morphology, nature of endosperm development, and level of seed coat pigmentation. Terminal phenotypes observed just before seed desiccation can differ significantly from initial phenotypes found early in development. Some defects are quite obvious and readily characterized when mutant embryos are examined under a dissecting microscope. Other types of abnormalities require visualization of cleared seeds with Nomarski optics or detailed examination of sectioned material. All mutant seeds regardless of their underlying cellular defect will eventually turn brown as the silique matures. Seeds arrested early in development generally turn brown before seeds arrested later in development. The timing of this transition, however, is quite variable and dependent on environmental conditions. Two mutant seeds containing arrested globular embryos with identical cellular defects may therefore appear different if one has already begun to desiccate and turn brown while the other is still inflated and white. Seed size and embryo morphology prior to desiccation are therefore more reliable indicators of differences in underlying cellular defects than variations in seed coat pigmentation.
)
Distinguishing Mutant Seeds from Unfertilized Ovules: Seeds that become arrested after fertilization can be distinguished from unfertilized ovules based on size and/or seed coat pigmentation. Unfertilized ovules resemble small white fists and do not turn brown upon desiccation. In contrast, seed coats of even the smallest aborted seeds will typically turn brown as the silique matures. Small brown structures are therefore aborted seeds and not unfertilized ovules. These differences are pictured below. The size of aborted seeds depends primarily on the extent of endosperm development, which often correlates with the extent of embryo development. Most aborted seeds containing arrested embryos composed of several cells are much larger than unfertilized ovules.
Unfertilized ovules on left, mutant seeds in center, wild-type seeds on right.
Identifying Spontaneously Aborted Seeds: When analyzing embryo-defective mutants, care must be taken to distinguish between mutant seeds and spontaneous abortants resulting from physiological or environmental stress. These spontaneous abortants may be common in siliques produced by plants grown under sub-optimal conditions or damaged in response to pathogens or physical treatment. Plants grown under ideal conditions should contain less than 1% spontaneously aborted seeds. Siliques that contain clusters of defective seeds, particularly at the tip of the silique, or a significant number of seeds with delayed but phenotypically normal embryos should be viewed with caution. Most spontaneous abortants are likely to arrest before the globular stage of embryo development or contain green embryos at a torpedo or linear stage of development surrounded by a seed coat that has prematurely turned brown. Some heterozygotes produce defective embryos with distinctive phenotypes that are readily distinguished from spontaneous abortants. Abnormal seeds that do not match the expected mutant phenotype can then be ignored. In other cases, a few defective seeds may need to be classified as unresolved because they cannot be clearly identified as either mutant seeds or spontaneous abortants. The best solution is to work exclusively with plants that exhibit a low frequency of spontaneous seed abortion. Wild-type plants growing in the same pot can be used to estimate abortion rates in the absence of an embryonic mutation.
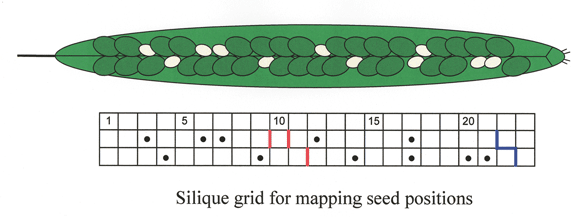
Mapping Seed Locations Within the Silique: We utilize a silique grid drawn on notebook paper to map the locations of mutant seeds within a silique.
Recording the Colors and Lengths of Mutant Seeds: The color of a mutant seed before desiccation is determined primarily by the mutant embryo and endosperm, which are visible through the translucent seed coat, and to some extent by the seed coat itself, which is composed of cells heterozygous for the mutation but nevertheless varies somewhat in appearance from one mutant to another. For the SeedGenes Project, we have utilized the following numerical system for recording colors of mutant seeds and embryos: (1) white; (2) pale yellow-green; (3) pale green; (4) green as in wild type; and (5) fusca with red/purple regions containing anthocyanin. Examples of the fusca phenotype are shown here. Seed length is measured in microns by placing a whole seed on a stage micrometer and noting the maximal length rounded to the nearest 50�m.
)
Fusca phenotype examples.
Characterizing Mutant Embryos:
Removing Embryos from Seeds: Mastering this technique is critical to the analysis of embryo-defective mutants and requires some practice and patience. We encourage new members of the laboratory to practice initially with wild-type seeds and then proceed to working with mutants. Wild-type embryos at the linear to cotyledon stages of development are most readily recovered because they are large in comparison to early stages and the seed coat has not yet become desiccated and sticky. Embryos can be removed by grasping one end of the seed with forceps and puncturing the other end with a syringe or second pair of forceps. Applying gentle pressure with the forceps will cause the embryo to be extruded from the seed. The embryo is more dense and compact than the surrounding endosperm and seed coat tissue and will therefore usually remain intact. Dissections are most readily performed at high magnification and with forearms resting comfortably on the lab bench next to the microscope. Forceps held close to their tips are more readily controlled than forceps held at a distance. Wild-type embryos back to the heart stage of development can with practice be recovered without much difficulty. Wild-type embryos at the globular stage are much more difficult to identify because of their small size. Fortunately, mutant embryos often become larger than wild-type embryos with a similar shape. For example, arrested globular embryos in siliques at advanced cotyledon stages are often larger than wild-type embryos at the heart stage and can with practice be easily found, removed, and measured. One approach that we have developed to facilitate the detailed analysis of isolated embryos is to perform dissections on a glass cover slip placed on the surface of an agar plate. Embryos can then be placed on the agar surface immediately after their removal from the seed and kept there for extended observations without the concern of premature desiccation. However, routine dissections performed as part of the SeedGenes Project are typically done on a stage micrometer so that isolated embryos can be measured quickly before they become desiccated.
)
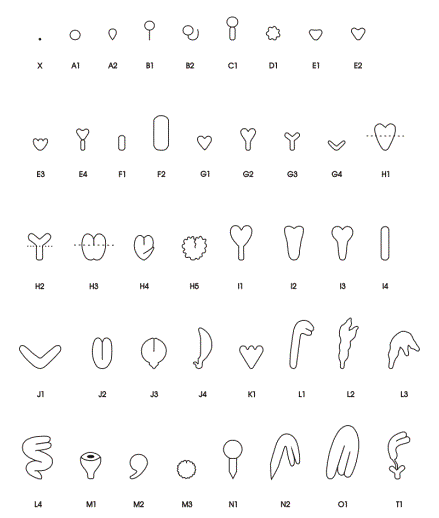
Classes of Terminal Phenotypes: Mutant embryos vary widely in terminal phenotype. Examples of embryos removed from immature seeds and observed under a dissecting microscope are shown here in black and white and in color . We have devised a classification system for terminal phenotypes based on a series of standardized and somewhat idealized morphological classes in order to facilitate the large-scale analysis of embryos for the SeedGenes Project. We recognize that some embryos are difficult to place into a single class based on observations with a dissecting microscope and that different classes may overlap to some extent. We have nevertheless found this system to be quite useful in keeping track of large numbers of mutant phenotypes. The classes are defined below and illustrated here.
Globular (G): No Distinct Cotyledons
| A | Globular Shape | |
| A1 | Standard shape | |
| A2 | Tear shape | |
| B | Globular with Suspensor | |
| B1 | Thin, straight suspensor | |
| B2 | Long, curled suspensor | |
| C | Globular with Giant Suspensor | |
| D | Globular with Irregular Surfaces | |
Transitional (T): Elongation / Cotyledon Initiation
| E | Early Transition to Heart Shape | |
| E1 | Triangular with no primordia | |
| E2 | Short cotyledon primordia | |
| E3 | Multiple bumps/primordia | |
| E4 | Wide suspensor | |
| F | Elongated Shape | |
| F1 | Small elongate/blimp (150-200 �m) | |
| F2 | Large elongate/blimp (>200-300 �m) | |
| G | Small Cotyledons and Hypocotyl (< 175 �m in length) | |
| G1 | Small heart | |
| G2 | Small heart with early development of hypocotyls | |
| G3 | Small thin cotyledons with early development of hypocotyls | |
| G4 | Small thin open cotyledons - no hypocotyls | |
Cotyledon (C): Increased Size and Differentiation
| H | Cotyledons and Hypocotyl (> 175 �m in length) | |
| H1 | Heart shape | |
| H2 | Thin cotyledons and hypocotyls | |
| H3 | Wide hypocotyls | |
| H4 | Bent hypocotyls | |
| H5 | Irregular surface | |
| I | Reduced Cotyledons | |
| I1 | Thin hypocotyl - very small cotyledons | |
| I2 | Broad hypocotyl - very small cotyledons | |
| I3 | Standard hypocotyl - very small cotyledons | |
| I4 | No cotyledons distinguishable (> 300 �m) | |
| J | Reduced Hypocotyl | |
| J1 | Open thin cotyledons - no hypocotyl | |
| J2 | Closed cotyledons - no hypocotyl | |
| J3 | Mature cotyledons - short hypocotyl | |
| J4 | Single cotyledon - short bent hypocotyl | |
| K | Large Heart with Multiple Apical Primordia | |
| L | Early Curled Cotyledons | |
| L1 | Short cotyledons | |
| L2 | Irregular short cotyledons | |
| L3 | Bent irregular short cotyledons | |
| L4 | Standard curled or mature cotyledons - bent or twisted hypocotyl | |
| M | Prominent, Fused or Folded Cotyledons | |
| M1 | Cup shaped cotyledons | |
| M2 | Spherical - short hypocotyl | |
| M3 | Partially fused - irregular surface | |
| N | Advanced Cotyledons; Signs of Vivipary | |
| N1 | Linear stage - clear tipped hypocotyl | |
| N2 | Curled stage - clear tipped hypocotyl | |
| O | Normal Mature Cotyledon Shape | |
| T | Twin Embryos | |
| T1 | Two embryos formed - cotyledon stage of development in at least one of the embryos | |
Recording the Colors and Lengths of Mutant Embryos: The colors of mutant embryos are noted using the same numerical system described above for seeds. Because embryos often turn darker green as they dry out, observations are made as soon as possible after removal from the seed coat. Dissections are performed on the surface of a stage micrometer to facilitate rapid measurement and classification. Small embryos are most readily seen on a black background and measured on a white background. We measure the axis of greatest distance without unfolding the cotyledons. Enlarged suspensors are not included in the measurement. Embryo size is rounded to the nearest 25�m.
Examining Cleared Seeds with Nomarski Optics
Advantages of Nomarski Optics: Nomarski optics (Differential Interference Contrast light microscopy) is a rapid and simple method used to look inside cleared seeds and reconstruct their three-dimensional structure. The result is a wealth of information on the internal organization of developing seeds and embryos. This technique requires specialized optical attachments to a standard compound microscope. Examples of Nomarski images of cleared wild-type seeds are shown here. One of the advantages of Nomarski optics is that it allows one to focus on several different optical planes within a seed. It is therefore possible to focus first on integument layers, then the endosperm tissue, then different layers of cells in the embryo proper, and finally the integuments on the lower surface of the seed. Nomarksi images are especially valuable when attempting to characterize early defects in the development of mutant seeds. Embryos too small to be visible under a dissecting microscope can also be examined and characterized. A sample link into SeedGenes shows images for a specific mutant. Nomarski optics is most appropriate for analyzing seeds before the linear stage of development. Increased pigmentation in the seed coat and larger numbers of cells in cotyledon embryos makes observations at later stages more difficult. Immature seeds need to be cleared and made transparent before being subjected to Nomarski optics. The clearing agent of choice in most laboratories is Hoyer's solution. Note that utilization of chloral hydrate in the United States requires special certification because it is classified as a controlled substance.
Preparation of Hoyer's Solution:
Components of Hoyer's solution:| 15 ml | Distilled Water |
| 3.75 g | Gum Arabic |
| 2.5 ml | Glycerine |
| 50 g | Chloral Hydrate |
Protocol for Preparation of Hoyer's Solution:
- Clean a 100 ml beaker and magnetic stir bar
- Add 15 ml distilled water to the 100 ml beaker
- Heat on low while stirring until the glass feels warm to the touch
- Add 3.75 g gum Arabic slowly in small amounts with constant stirring
- Minimize heat to avoid caramelizing the gum Arabic
- Add 2.5 ml glycerine (viscous liquid) with a 5 ml syringe
- Add 50 g chloral hydrate (10 g at a time)
- Allow all components to fully dissolve
Hoyer's solution prepared according to these instructions is effective on seeds from the globular to heart stages with visualization possible after a matter of minutes. Seeds containing embryos beyond the torpedo stage require more time for clearing but will be ready to visualize within an hour or two. More mature seeds with fully developed and pigmented cotyledons require extra time and the image quality is reduced. We often dilute this standard (full-strength) stock with 2 parts distilled water to 1 part stock solution to generate a working solution that produces better images for young seeds.
Methods of Seed Preparation: Materials needed for seed clearing are fine forceps, needle, glass slides, cover slips, and Hoyer's solution. Siliques containing seeds at the desired stage should be examined first under a dissecting microscope. Mutant seeds are then removed one or two at a time and placed on the surface of a drop (1-2 cm diameter) of Hoyer's solution on a glass slide. Seeds must not be punctured or submerged in the Hoyer's solution. Place 15 to 20 seeds per drop for best results. With mutants that arrest early in development, focus on siliques with wild-type embryos at the globular to heart stage and clear all of the seeds from one silique in the same drop of Hoyer's solution. This simplifies and optimizes the comparison of mutant and wild-type embryos. Avoid seeds with a brown seed coat because they do not clear well. Gently place a cover slip on top of the drop, being careful to avoid forming air bubbles beneath the cover slip. The slide should then labeled and set aside for the desired length of time.
Visualization and Image Storage: Cleared seeds on the glass slide are visualized using a compound light microscope equipped with Nomarski optics. Microscope adjustments and protocols vary depending on the manufacturer and model. For the SeedGenes Project, we have used a Nikon E600 compound microscope and captured images with a Nikon DXM1200 digital imaging system equipped with Nikon ACT-1 software. Most images were taken with a 20X objective.
- Original Image Captured with ACT-1:
- Pixel dimensions: W 3840, H 3072
Document size in cm: W 135.47, H 108.37
Resolution in pixels/cm: 28.346
- Resized Image Using Photoshop:
- Pixel dimensions: W 1181, H 945
Document size in cm: W 10, H 8
Resolution in pixels/cm: 118.11
Constrain proportions and resample image
- Montage of Six Images:
- Pixel dimensions: W 1535, H 1506
Document size in cm: W 13, H 12.75
Resolution in pixels/cm: 118.11
- Resized Final Montage for SeedGenes:
- Pixel dimensions: W 600, H 589
Document size in cm: W 5.08, H 4.99
Resolution in pixels/cm: 118.11
Constrain proportions and resample image
Completing a Comprehensive SeedGenes Analysis
Overview of 2010 Analysis: Mutants chosen for detailed genetic and phenotypic characterization in our laboratory are subjected to a standardized protocol that we term "2010 Analysis". Results of these studies are then presented in the Profile section of SeedGenes. Twenty-five immature siliques from selfed heterozygotes are chosen for detailed counts and position mapping of mutant and normal seeds. Results are used to calculate segregation rations (percent mutant seeds) and determine whether mutant seeds are randomly distributed along the length of the silique. One hundred mutant seeds from these siliques are then selected for measurements, color determinations, and embryo classifications. Results are used to calculate average seed and embryo lengths and colors in addition to providing standardized information on the diversity of mutant phenotypes observed. Nomarksi images are prepared from cleared mutant seeds arrested before the cotyledon stage of embryo development and assembled into a montage for presentation at SeedGenes.Forms and Lab Instructions: The following links can be used to obtain PDF images of standardized forms used to complete a SeedGenes analysis. Please contact David Meinke, SeedGenes Project PI (meinke@okstate.edu) if you have specific questions about these forms or about the analysis of embryo-defective mutants. We welcome contributions of detailed genetic and phenotypic data on seed mutants isolated and characterized elsewhere and we are always receptive to collaborations on the analysis of specific mutants identified in other laboratories.